StackLeader Blog
AWS Simple Email Service quickstart on Node.js
This blog post will utilize the StackLeader Node.js Docker container.
https://hub.docker.com/r/stackleader/node
The source code for this blog post is located at:
https://github.com/stackleader/node-quickstarts
Run the Quickstart
Clone the project locally.
 git clone [email protected]:stackleader/node-quickstarts.git
 cd node-quickstarts/aws/ses/send
 npm install
 docker pull stackleader/node
Next, you will need to login into your AWS account, setup AWS SES, and create AWS IAM credentials for AWS SES.
AWS SES Configuration
Navigate to the SES control panel in AWS or follow the link below.
https://console.aws.amazon.com/ses/home
First, you must verify the domain that you want to send from. Select Identity Management->Domains->Verify a New Domain. Type in your domain and select Generate DKIM Settings. DKIM will improve your mail acceptance. If you use Route 53 (DNS by AWS) then the next step will try to add the records automatically. If not, just add the records at your dns provider.
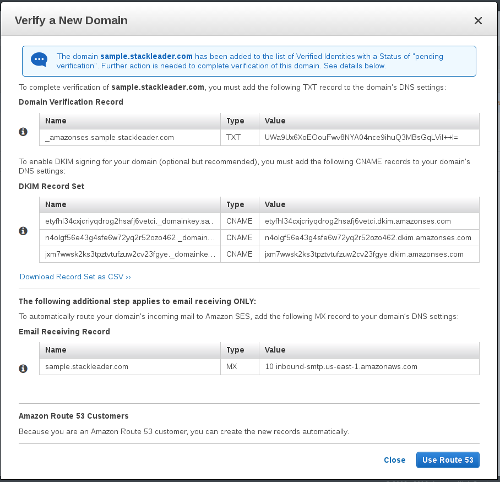
It takes a few minutes for the domain to be verified once the dns changes are published. The domain status will change
from pending to verified.
Next, verify a sending email address by selecting Identity Management->Email Addresses->Verify a New Email Address. Add a valid email address that you want to send from and select Verify this Email Address. AWS will send an email with a verification link fairly quickly after submission.
If this is your first time using AWS SES then you will have sending restrictions. You must request to have the restrictions lifted from the SES console. Until the limits are lifted, you can only send emails to your verified email addresses.
AWS IAM
Navigate to the IAM control panel in AWS or follow the link below
https://console.aws.amazon.com/iam/home
Select Users->Create New Users. Input a username and check Generate an access key for each user. Download or save the
generated Access Key ID and Secret Access Key. Select Close when done.
Now that a user is generated, return to the Users list and select the new user. Click on the Permissions tab for the user.
Select attach policy. Search for AmazonSESFullAccess, select it, and then Attach Policy. You have successfully created
a user capable of sending SES email!
Node.js project configuration
Create a properties.txt file at node-quickstarts/aws/ses/send/properties.txt with the following contents.
aws.key=REPLACE_WITH_AWS_KEY
aws.secret=REPLACE_WITH_AWS_SECRET_KEY
email.from=REPLACE_WITH_SES_VALIDATED_EMAIL
Run the app from the node-quickstarts/aws/ses/send directory using the node Docker container.
docker run -it --rm -p 5000:5000 -v "$PWD":/usr/src/app -w /usr/src/app stackleader/nodeTest firing off an email!
curl -v -X POST -d 'to=REPLACE_WITH_SES_VALIDATED_EMAIL&subject=test&message=Hello world' http://localhost:5000/message